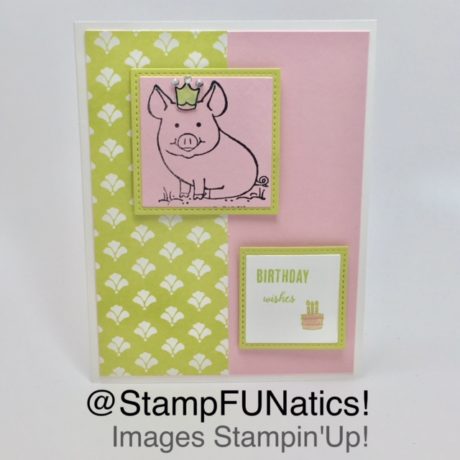
I just received the February Paper Pumpkin kit. Everyone needs birthday gift cards. Check out my alternative Birthday card project. [Read more…] about Paper Pumpkin February 2017 Bonus Tutorial
Uncategorized
French Valentine Tag
by Gigi
I have been invited to a French Candlemas party. [Read more…] about French Valentine Tag
New Sale-a-bration Make a Medallion and Glimmer Pack Sneak Peek
by Gigi
I am excited to share three new products in Sale-a-bration that starts February 21st and goes through March 31st. [Read more…] about New Sale-a-bration Make a Medallion and Glimmer Pack Sneak Peek
Manly Valentine Card
by Gigi
I have been showing you a lot of Valentine themed cards and projects and noticed I wanted to do a more manly card for the men in my life. [Read more…] about Manly Valentine Card
Yummy in My Tummy treat bag
by Gigi
Who couldn’t resist this cute monster? He’s giving a great big hug! This Mini Treat bag is extra special, because he is a shaker bag. So join me for some fun and see how I made him.
Instructions:
1. Cut half a piece of the Designer paper Party Animal. Use the Mini Treat Bag thinlits to cut bag.
2. Assemble bag using fast fuse.
3. Stamp monster using Black Memento ink on the opposite side of the designer paper. Cut out with scissors.
4. Punch out a circle in his tummy using the 1-1/2″ circle punch.
5. Add 1-3/4 X 1-3/4 window sheet with glue dots in the corners and attach to the back of the opening.
6. Adhere the foam strips around the circle opening over the window sheets.
7. Sprinkle the embellishments in the center of the circle and then remove the backing on the strips.
8. Add a piece of the same print designer paper over the circle so it shows through on the front.
9. Add dimensionals and snail to attach the monster to the lower right corner of the bag.
10. Stamp saying in Emerald Envy ink and cut with layering circles.
11. Cut a piece of the Emerald Envy cardstock with the next size scallop circle.
12. Put two dimensionals on the back of the white saying. Take a small piece of ribbon and stick it on the dimensionals to make a flag.
13. Stick the saying on to the scalloped piece.
14. Add a dimensional on to the Emerald scalloped piece and attach to the bag.
Product List
|
|||
|
|
|
|
|
|
|
|
|
|
|
February Stamp Class – Birthday Bash
by Gigi
Let’s get our birthday cards ready, so we have some on hand. I have created some bright and fun birthday cards using some of our beautiful Party Animal Designer paper. I am also using the Carried Away Designer paper you can earn for FREE in Sale-a-bration.
Sign up now and make these three cute cards.
Sunday, Feb. 5th 2:00-4:00
Monday, Feb. 6th 10:00-12:00
We will be using Lift Me Up and Cool Treats Bundles.
Please RSVP by 2/1 to stampfunatics@gmail.com to reserve your spot. I will send you a Pay Pal invoice. Your paid invoice reserves your spot. Click here to see my full calendar!
Sealed with a Kiss Valentine treat box
by Gigi
The time is flying by and Valentine’s Day will be here before you know it. I have prepared a Valentine treat box using the envelope punch board and the Sealed with Love Stamp set in our Occasion’s catalog. This box is quick and easy and is sure to make your Valentine smile.
Instructions:
1. Take a 6 X 6 piece of the Sending Love Designer paper stack and line it up on the envelope punch board at the 1-3/8″ mark. Punch and score. Slide to the 4″ mark and punch and score.
2. Turn the paper and punch and score at the scored lines for the following 3 sides.
3. Cut up to the first scored line on the wider end. Repeat with the opposite side.
4. Bring up one end of the box and attach with snail or fast fuse.
5. Attach the two smaller tabs down on either side to the side of the box with adhesive.
6. Bring up the back of the box. Punch a hold at the top of the back using the 1/2″ circle punch. Thread the ribbon through the hold and tie a bow.
7. Stamp Sealed with a Kiss in Real Red on a piece of Whisper White cardstock. Stamp the lips in red too. Punch out the saying using the 1-1/2″ circle punch.
8. Punch the Silver Glimmer paper using the 1-3/4″ circle punch.
9. Attach the saying to the glimmer piece using a dimensional.
10. Add a dimensional to the back of the glimmer piece and attach to the box.
11. Add rhinestones to either side covering the dots.
12. Fussy cut the lips and add to the top of the saying with a dimensional.
Product List
|
|||
|
|
|
|
|
|
|
|
|
Paper Pumpkin January 2017 Bonus Tutorial
by Gigi
I just received the January Paper Pumpkin kit. Love, love, love this kit! It makes 24 cute and little gift bags. The stamps have a Valentine theme, but there are a few stamps that can work for other occasions. I love how Stampin’ Up! thinks of everything.
If you find you don’t need that many gift bags, not to worry, you can always use the supplies to make alternative projects and cards. I have created a video to show you how to assemble the bags and also included an extra tutorial on how I made a card using the kit and a few extra products.
Click here to subscribe with me for your Paper Pumpkin kit, and I will send you a monthly e-mail with more additional alternative ideas that you can make using your kit. The kit comes with everything you will need to make their projects or cards. All you will need to add is your adhesives. Take advantage of their sale and earn Free Sale-a-bration products.
Instructions:
1. Cut a piece of Calypso Coral cardstock 8-1/2″ X 5-1/2″ and score at 4-1/4.
2. Cut a piece of Whisper White cardstock 4′ X 5-1/4″.
3. Emboss the white piece with the Happy Hearts embossing folder.
4. Cut a piece of the Gold Metallic ribbon and wrap around the embossed piece and secure with snail.
5. Attach the white piece to the card.
6. Make a bow and attach to the ribbon with a glue dot.
7. Cut out a Coral piece with the Sweet & Sassy heart framelits.
8. Cut one of the Paper Pumpkin boxes with the next heart shape down in size.
9. Stamp the saying with Calypso Coral ink on a piece of Whisper White cardstock and cut out with a smaller heart.
10. Attach all hearts with dimensionals and attach the heart to the card with dimensionals.
Product List
|
|||
|
|
Sealed with Love Gift Box
by Barry
Sealed with Love Cupcake Treat
On Sunday, I met with my Team. I wanted to make a treat for them, so I came up with our cute 3 X 3 white boxes as a perfect way to deliver a tasty cupcake to all of them. I wanted my meeting to be a Valentine theme, to let them know how much I love them on my Team. It was so fun to meet with all of them and share ideas, try out new products and do a few make & takes.
I’d love for you to join my Team during Sale-a-bration. You can earn 2 extra stamp sets free. You don’t have to live local to be part of our group. We do Facebook Live meetings most of the time and meet live quarterly. I also have a private Facebook group, where we communicate anytime. Send an e-mail to stampfunatics@gmail.com or you can call me and we can chat further.
Instructions:
1. Assemble a 3 X 3 white gift box.
2. Cut 6 pieces of 3 X 3 Designer paper.
3. Hole punch one of the designer pieces with the 1/2″ circle punch halfway.
4. Adhere piece to the front of the box with snail. Adhere the other side pieces and the top with snail.
5. Stamp saying with Real Red ink and punch out using the Heart framelits.
6. Cut the last piece of designer paper with the next largest heart framelit.
7. Attach the saying to the designer heart with snail and attach the heart to the front of the box with dimensionals.
8. Tie up box using white ribbon.
|
|
|
|
|
|
||
Custom Tee Gift Cardholder
by Gigi
I needed to make a card for a friend for his birthday and decided to make it a gift card so I could include a surprise. Instead of a gift card, since we were only doing cards, I decided to include some lottery tickets. I thought it would be fun for him to try his luck. You never know. So for this card I used the new Custom Tee stamp set in the new Occasion’s catalog. It comes as a bundle with matching framelits and you always save 10% when you purchase the set as a bundle. Enjoy the video and see how I made this fun gift card. If you need to purchase any of the supplies, please click on the items below.
Instructions:
1. Take a piece of Bermuda Bay cardstock and cut down the middle to 4-1/4 X 11.
2. Score on the longer side at 4-1/2, 5-1/2 and 6-1/2.
3. Fold on score lines back and forth. You should have a piece that will pop up after folded.
4. Glue or tape at the bottom of the outside folds.
5. Punch with the window punch on the inside pop up piece lining your punch at the outside edges. Snip away any extra piece in the middle. This should fit your gift card.
6. Cut a piece of designer paper 4 X 4-1/4. Attach to the outside of the card with snail.
7.Cut a scalloped circle piece using the layering circle framelits and a piece of Whisper White cardstock.
8. Stamp the t shirt on a piece of Bermuda Bay cardstock. Ink up the saying with your black stampin’ write marker. Clean stamp good and ink up the stars and add to either side of the shirt at the shoulders.
9. Use your framelits to cut out the shirt. Attach the shirt to the circle with snail.
10. Attach the circle to the card front with dimensionals.
11. Add the metallic stars to opposite corners of the front of the card.
12. Cut a piece of Whisper White cardstock 4 X 4-1/4 and attach to the inside of the card.
13. Stamp sentiment in Bermuda Bay ink on the inside of the card.
14. Take cd envelope and punch out stars using the small star punch and Bermuda Bay cardstock. Attach to the outside of the envelope with glue dots.
15. Attach one metallic star inside one of the stars.
|
|||
|
|
||
|
- « Go to Previous Page
- Go to page 1
- Interim pages omitted …
- Go to page 46
- Go to page 47
- Go to page 48
- Go to page 49
- Go to page 50
- Interim pages omitted …
- Go to page 57
- Go to Next Page »