


I have started buying plants for my garden. Yes even in the dessert, I can grow roses and gardenias. While I was at the nursery, I noticed all the beautiful succulents and cactus.
So when I got home, I took out my Simply Succulents Bundle and started creating. I love the set comes with several succulent plants, a flower pot, some beautiful expressions and dies to cut out sayings and the flowers and pot. It also has a full size background die. I have been practicing with my Blend Markers and some blending brushes and am so happy it is so easy. It’s so calming to color. Our Blend markers make this look so easy and impressive. I also will show you a Slide & Lock card that is a cool technique along with using the nice background die to make a stencil and some cool effects for different cards. I think you will love it. Instructions & Supplies, read more..
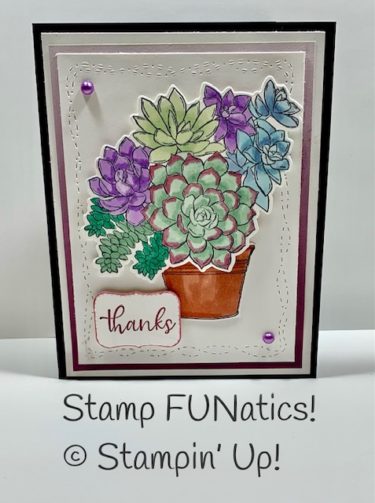
Instructions: Cut Black 5-1/2″ X 8-1/2″ and score at 4-1/4″.
Cut white 4″ X 5-1/4″. Glue to base.
Cut Oh So Ombre paper 3-3/4″ X 5″. Glue to card.
Cut white 3-1/2″ X 4-3/4″. Emboss with the Stitched with Whimsy Die. Glue to card.
Stamp pot and succulents with Black Memento ink and Basic White paper.
Color pot and flowers with Blend markers.
I used Rich Razzleberry on the tips of the main front succulent. Use the color lifter to lighten areas after you blend.
Die cut the pot and flowers with the matching dies.
Attach the pot with glue to the card. Use dimensionals to pop up the flowers over the pot.
Stamp the saying in Highland Heather ink on white cardstock and use the die to cut out the saying. Use the side of your light Highland Heather Blend marker brush to color the edges. Pop up with dimensionals and add to card.
Add the pearls as shown in the photo.
 |  | |
 | ||
 |  |  |
 |
 Cardstock")

 Designer Series Paper")


